
本文来自于中国科学院深圳先进技术研究院,目前发表在arXiv上,是2016年4月份的文章,算是比较新的文章。
论文地址:
https://kpzhang93.github.io/MTCNN_face_detection_alignment/
概述
相比于R-CNN系列通用检测方法,本文更加针对人脸检测这一专门的任务,速度和精度都有足够的提升。R-CNN,Fast R-CNN,FasterR-CNN这一系列的方法不是一篇博客能讲清楚的,有兴趣可以找相关论文阅读。类似于TCDCN,本文提出了一种Multi-task的人脸检测框架,将人脸检测和人脸特征点检测同时进行。论文使用3个CNN级联的方式,和Viola-Jones类似,实现了coarse-to-fine的算法结构。
框架
算法流程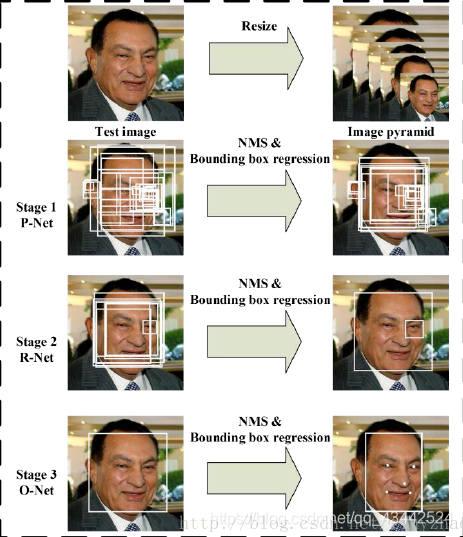
当给定一张照片的时候,将其缩放到不同尺度形成图像金字塔,以达到尺度不变。
Stage 1:使用P-Net是一个全卷积网络,用来生成候选窗和边框回归向量(bounding box regression vectors)。使用Bounding box regression的方法来校正这些候选窗,使用非极大值抑制(NMS)合并重叠的候选框。全卷积网络和Faster R-CNN中的RPN一脉相承。
Stage 2:使用N-Net改善候选窗。将通过P-Net的候选窗输入R-Net中,拒绝掉大部分false的窗口,继续使用Bounding box regression和NMS合并。
Stage 3:最后使用O-Net输出最终的人脸框和特征点位置。和第二步类似,但是不同的是生成5个特征点位置
CNN结构
本文使用三个CNN,结构如图: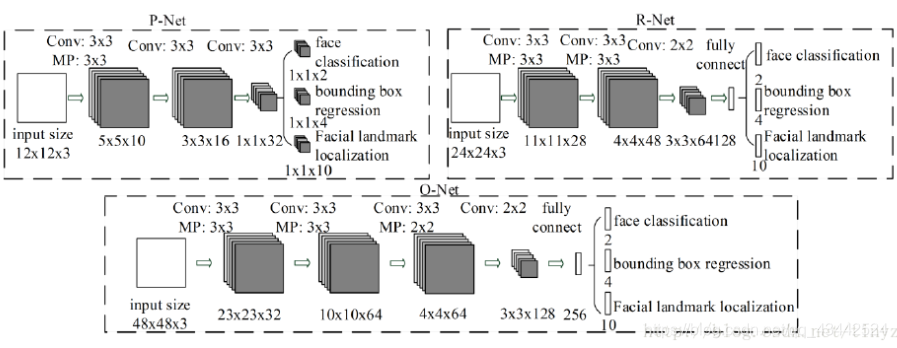
训练
这个算法需要实现三个任务的学习:人脸非人脸的分类,bounding box regression和人脸特征点定位。
(1)人脸检测
这就是一个分类任务,使用交叉熵损失函数即可:
(2)Bounding box regression
这是一个回归问题,使用平方和损失函数:
(3)人脸特征点定位
这也是一个回归问题,目标是5个特征点与标定好的数据的平方和损失:
(4)多任务训练
不是每个sample都要使用这三种损失函数的,比如对于背景只需要计算,不需要计算别的损失,这样就需要引入一个指示值指示样本是否需要计算某一项损失。最终的训练目标函数是:
N是训练样本的数量。表示任务的重要性。在P-Net和R-Net中,在O-Net中,
(5)online hard sample mining
传统的难例处理方法是检测过一次以后,手动检测哪些困难的样本无法被分类,本文采用online hard sample mining的方法。具体就是在每个mini-batch中,取loss最大的70%进行反向传播,忽略那些简单的样本。
实验
本文主要使用三个数据集进行训练:FDDB,Wider Face,AFLW。
A、训练数据
本文将数据分成4种:
Negative:非人脸
Positive:人脸
Part faces:部分人脸
Landmark face:标记好特征点的人脸
分别用于训练三种不同的任务。Negative和Positive用于人脸分类,positive和part faces用于bounding box regression,landmark face用于特征点定位。
B、效果
本文的人脸检测和人脸特征点定位的效果都非常好。关键是这个算法速度很快,在2.6GHZ的CPU上达到16fps,在Nvidia Titan达到99fps。
总结
本文使用一种级联的结构进行人脸检测和特征点检测,该方法速度快效果好,可以考虑在移动设备上使用。这种方法也是一种由粗到细的方法,和Viola-Jones的级联AdaBoost思路相似。
类似于Viola-Jones:1、如何选择待检测区域:图像金字塔+P-Net;2、如何提取目标特征:CNN;3、如何判断是不是指定目标:级联判断。
本次实验过程
使用MTCNN将人脸选择出来(分割人脸),然后使用facenet训练(欧氏距离算法
compare.py源码如下
1 | """Performs face alignment and calculates L2 distance between the embeddings of images.""" |
compare.py 该py文件作用是用自己的图像上应用已有模型来计算人脸之间的距离,即欧氏距离。
当欧氏距离小于1时,我们可以看做输入的两个照片为同一个人。
这三张照片分为起名为 img1.jpg,img2.jpg,img3.jpg。
在facenet目录下运行
python src/compare.py models/20180408-102900 src/img1.jpg src/img2.jpg src/img3.jpg
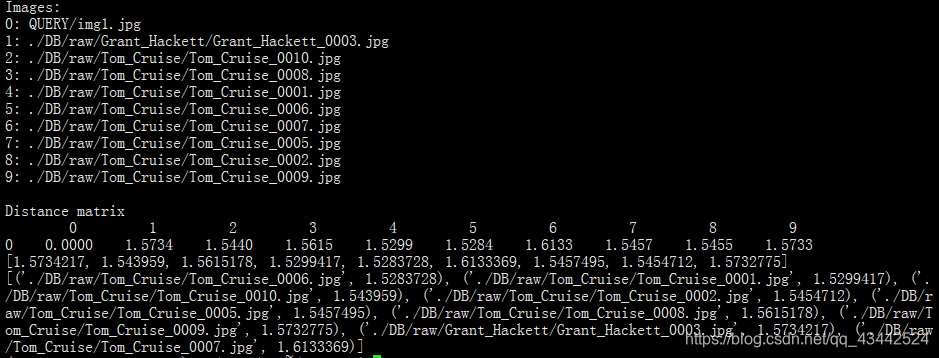
结果:
上面为官方的输入和输出
但是在该比赛中,比赛评委要求输出:
(输出)检索结果:要求参评单位将检索结果整理为CSV文件。
每一项用制表符'\t'分割,每一行具体格式如下:(所有输出以UTF-8无BOM格式编码)
查询图像ID\t底库中对应top1相似度的人脸ID\t相似度\t底库中对应top2相似度的人脸ID\t相似度\t…\t底库中对应top50相似度的人脸ID\t相似度
我尝试用compare.py文件的欧氏距离来计算出图片的相似度
开始修改源码
(过程很痛苦,网上没有修改compare.py文件的例子)
1.将矩阵输出为1行,即只取第一行矩阵。因为比赛只要求用QUERY _查询集唯一ID.jpg去DB库里比较所有图片
1 | print('Distance matrix') |

- 将图片id与矩阵里的数据组成字典,并且按照比赛要求排序
1 | list_images=[] #图片路径的列表 |
知识点:
sorted函数
sorted(iterable,key,reverse),sorted一共有iterable,key,reverse这三个参数;
其中iterable表示可以迭代的对象,例如可以是dict.items()、dict.keys()等
key是一个函数,用来选取参与比较的元素,reverse则是用来指定排序是倒序还是顺序,reverse=true则是倒序,
reverse=false时则是顺序,默认时reverse=false。
dict(zip)
zip是Python中的一个内建函数,能够用来组合多个序列类型的数据。它会把传入的所有序列中下标相同的元素组成一个个元组,以最短的序列为基准。
3.用QUERY里的照片去DB库找相似度前50的人脸照片,需要知道DB库中所有照片的路径
1 | import glob |
4.用for循环将QUERY _查询集唯一ID.jpg与DB库中的照片每10张就比一次
1 | #set a b |
- 将数据写入列表,然后排出前50,并且写入csv文件
1 | import csv |
1)将QUERY的照片一个一个与DB里所有的照片进行比对
1 | image_QUERY_path = glob.glob(r"./QUERY/*.jpg") |
将列表里的元组用逗号分开,并且消除括号1
list_result=','.join(list_result[0:50])
报错:
原因:
list包含数字,不能直接转化成字符串。
解决办法:','.join('%s' %result for result in list_result)
即遍历list的元素,把它转化成字符串
运行后报错:TypeError: not all arguments converted during string formatting
原因: % 操作符只能直接用于字符串(‘123’),列表([1,2,3])、元组