网站架构
基于Docker容器里构建高并发网站
拓扑图:
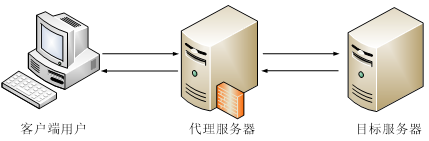
正向代理
- 代理:也被叫做正向代理,是一个位于客户端和目标服务器之间的代理服务器
- 作用:客户端将发送的请求和指定的目标服务器提交给代理服务器,然后代理服务器向目标服务器发起请求,并将获得的响应结果返回给客户端的过程
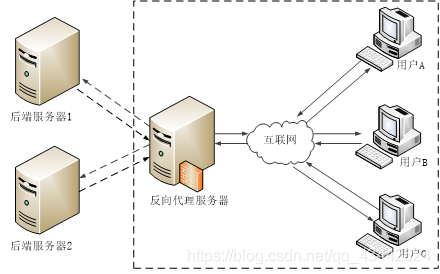
反向代理
- 反向代理:对于客户端而言就是目标服务器
- 作用:客户端向反向代理服务器发送请求后,反向代理服务器将该请求转发给内部网络上的后端服务器,并将从后端服务器上得到的响应结果返回给客户端
反向代理服务配置
- 反向代理的配置指令:proxy_pass,用于设置后端服务器的地址。该地址中包括传输数据使用的协议、服务器主机名以及可选的URI资源等
作用范围:通常在location块中进行设置
负载均衡
指令:upstream指令可以实现负载均衡,在该指令中能够配置负载服务器组
- 配置方式:目前负载均衡有4种典型的配置方式
| 配置方式 | 说明 |
|---|---|
| 轮询方式 | 负载均衡默认设置方式,每个请求按照时间顺序逐一分配到不同的后端服务器进行处理,如果有服务器宕机,会自动剔除 |
| 权重方式 | 利用weight指定轮询的权重比率,与访问率成正比,用于后端服务器性能不均的情况 |
| ip_hash方式 | 每个请求按访问IP的hash结果分配,这样可以使每个访客固定访问一个后端服务器,可以解决Session共享的问题 |
| 第三方模块 | 采用fair时,按照每台服务器的响应时间来分配请求,响应时间短的优先分配;若第三方模块采用url_hash时,按照访问url的hash值来分配请求 |
配置nginx反向代理,使用nginx1、APP1、APP2三个容器
使用php-apache镜像启动APP1和APP2两个容器
1) docker network create –subnet=172.18.0.0/16 cluster //创建docker网络1
2
3
4
5
6
7
8
9[root@localhost ~]# docker network create --subnet=172.18.0.0/16 cluster
93cf616f5b6466f3872a697e7246d525173405659d659f775584460cc523fc19
[root@localhost ~]# docker network ls
NETWORK ID NAME DRIVER SCOPE
5b668484dc8f bridge bridge local
93cf616f5b64 cluster bridge local
f2010c589fe5 host host local
3e84fc461677 none null local
[root@localhost ~]#
2) 启动容器APP1,设定地址为172.18.0.111, 启动容器APP2,设定地址为172.18.0.112
docker run -d --privileged --net cluster --ip 172.18.0.111 --name APP1 php-apache /usr/sbin/initdocker run -d --privileged --net cluster --ip 172.18.0.112 --name APP2 php-apache /usr/sbin/init1
2
3
4
5
6
7
8
9[root@localhost ~]# docker run -d --privileged --net cluster --ip 172.18.0.111 --name APP1 php-apache /usr/sbin/init
0119783e023dbd322e6598c4556743408fb2fda176b26406b8c80d3d982bf02e
[root@localhost ~]# docker run -d --privileged --net cluster --ip 172.18.0.112 --name APP2 php-apache /usr/sbin/init
f2744c76c1759187788620e84705a0905b1021da4d987620b96cc0f3b4d2eac8
[root@localhost ~]# docker ps
CONTAINER ID IMAGE COMMAND CREATED STATUS PORTS NAMES
f2744c76c175 php-apache "/usr/sbin/init" 4 seconds ago Up 2 seconds APP2
0119783e023d php-apache "/usr/sbin/init" 20 seconds ago Up 18 seconds APP1
[root@localhost ~]#
3) 配置容器APP1,编辑首页内容为“site1”1
2
3
4
5
6
7
8
9
10[root@localhost ~]# docker exec -it f27 /bin/bash
[root@f2744c76c175 /]# vim /var/www/html/index.html
[root@f2744c76c175 /]# systemctl status httpd
● httpd.service - The Apache HTTP Server
Loaded: loaded (/usr/lib/systemd/system/httpd.service; disabled; vendor preset: disabled)
Drop-In: /usr/lib/systemd/system/httpd.service.d
└─php-fpm.conf
Active: inactive (dead)
Docs: man:httpd.service(8)
[root@f2744c76c175 /]# systemctl start httpd
4) 配置容器APP1,编辑首页内容为“site2”1
2
3
4[root@localhost ~]# docker exec -it 011 /bin/bash
[root@0119783e023d /]# vim /var/www/html/index.html
[root@0119783e023d /]# systemctl start httpd
[root@0119783e023d /]#
5)在宿主机访问1
2
3
4
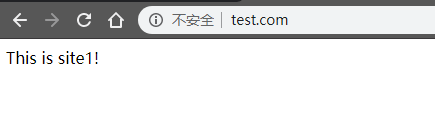
5[root@localhost ~]# curl 172.18.0.111
This is site1!
[root@localhost ~]# curl 172.18.0.112
This is site2!
[root@localhost ~]#
使用nginx镜像启动nginx1容器,配置反向代理
1) 启动容器nginx1,设定地址为172.18.0.11docker run -d --privileged --net cluster --ip 172.18.0.11 -p 80:80 --name nginx1 nginx /usr/sbin/init1
2
3
4[root@localhost ~]# docker run -d --privileged --net cluster --ip 172.18.0.11 -p 80:80 --name nginx1 nginx /usr/sbin/init
b0db3efdfe817b3df2557ef598e6bf709a5cabcfe2122d40caf344ee96075aac
[root@localhost ~]# docker exec -it b0d /bin/bash
[root@b0db3efdfe81 /]#
2) 在容器nginx1编辑/etc/nginx/nginx.conf文件,重新启动nginx服务
配置两台虚拟主机1
2
3
4
5
6
7
8
9
10
11
12
13
14server {
listen 80;
server_name site1.test.com;
location / {
proxy_pass http://172.18.0.111;
}
}
server {
listen 80;
server_name site2.test.com;
location / {
proxy_pass http://172.18.0.112;
}
3) }在主机编辑hosts文件1
2
3宿主机的IP地址 site1.test.com
宿主机的IP地址 site2.test.com
宿主机的IP地址 www.test.com
4) 在主机使用浏览器访问site1.test.com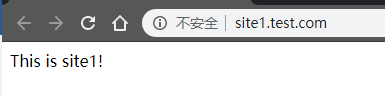
5) 在主机使用浏览器访问site2.test.com
配置nginx负载均衡,使用nginx1、APP1、APP2三个容器
保持以上三个容器不变
使用nginx1容器,配置nginx一般轮询负载均衡
1) 在容器nginx1编辑/etc/nginx/nginx.conf文件,重新启动nginx服务
配置 www.test.com虚拟主机1
2
3
4
5
6
7server {
listen 80;
server_name www.test.com;
location / {
proxy_pass http://APP;
}
}
配置负载均衡服务器组1
2
3
4upstream APP {
server 172.18.0.111;
server 172.18.0.112;
}
2) 在主机使用浏览器访问 www.test.com并不断刷新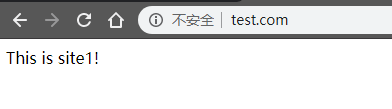

使用nginx1容器,配置nginx IP哈希轮询
1) 在容器nginx1编辑/etc/nginx/conf.d/default.conf文件,重新启动nginx服务
配置 www.test.com虚拟主机1
2
3
4
5
6
7server {
listen 80;
server_name www.test.com;
location / {
proxy_pass http://APP;
}
}
配置负载均衡服务器组1
2
3
4
5upstream APP {
ip_hash;
server 172.18.0.111;
server 172.18.0.112;
}
2) 在不同ip主机使用浏览器访问 www.test.com