
etcd介绍
高可用的分布式key-value存储,可以用于配置共享和服务发现
- 类似的项目:
Zookeeper和consul - 开发语言:
go - 接口:提供
Restful的接口,使用简单 - 实现算法:基于raft算法的强一致性,高可用的服务存储目录
etcd的应用场景:
- 服务发现和服务注册
- 配置中心(我们实现的日志收集客户端需要用到)
- 分布式锁
- master选举
etcd的命令验证1
2
3
4
5
6PS E:\Study\etcd-v3.4.5-windows-amd64> .\etcdctl.exe put name xu
OK
PS E:\Study\etcd-v3.4.5-windows-amd64> .\etcdctl.exe get name
name
xu
PS E:\Study\etcd-v3.4.5-windows-amd64>
context 介绍和使用
Context即为上下文管理,那么context的作用是做什么,主要有如下两个作用:
- 控制goroutine的超时
- 保存上下文数据
context的超时控制:1
2
3
4
5
6
7
8
9
10
11
12
13
14
15
16
17
18
19
20
21
22
23
24
25
26
27
28
29
30
31
32
33
34
35
36
37
38
39
40
41
42
43
44
45
46
47
48
49
50
51package main
import (
"context"
"fmt"
"io/ioutil"
"net/http"
"time"
)
type Result struct {
r *http.Response
err error
}
func process() {
// context的超时控制
ctx, cancel := context.WithTimeout(context.Background(), 2*time.Second)
defer cancel()
tr := &http.Transport{}
client := &http.Client{Transport: tr}
c := make(chan Result, 1)
// 如果请求成功了会将数据存入到管道中
req, err := http.NewRequest("GET", "http://www.baidu.com", nil)
//req, err := http.NewRequest("GET", "https://www.google.com", nil)
if err != nil {
fmt.Println("http request failed, err:", err)
return
}
go func() {
resp, err := client.Do(req)
pack := Result{r: resp, err: err}
c <- pack
}()
select {
case <-ctx.Done(): // 如果超时, ctx.Done()返回一个管道,当管道里有数据即可说明超时
//tr.CancelRequest(req)
tr.CloseIdleConnections()
res := <-c
fmt.Println("Timeout! err:", res.err)
case res := <-c: // c管道里的数据传给res, 如果res里有数据则证明请求成功
defer res.r.Body.Close()
out, _ := ioutil.ReadAll(res.r.Body)
fmt.Printf("Server Response: %s", out)
}
return
}
func main() {
process()
}
req, err := http.NewRequest("GET", "http://www.baidu.com", nil)
正常返回百度网站的网页html
req, err := http.NewRequest("GET", "https://www.google.com", nil)
返回失败
Timeout! err: Get "https://www.google.com": dial tcp 205.186.152.122:443: connectex: A connection attempt failed because the connected party did not properly respond after a period of time, or established connection failed because connected host has failed to respond.
context保存上下文1
2
3
4
5
6
7
8
9
10
11
12
13
14
15
16
17
18
19
20
21
22package main
import (
"context"
"fmt"
)
func process(ctx context.Context) {
ret, ok := ctx.Value("trace_id").(int)
if !ok {
ret = 789
}
fmt.Printf("ret:%d\n", ret)
s, _ := ctx.Value("session").(string)
fmt.Printf("seesion:%s\n", s)
}
func main() {
ctx := context.WithValue(context.Background(), "trace_id", 123)
ctx = context.WithValue(ctx, "session", "This is a session")
process(ctx)
}
ret:123
seesion:This is a session
结合etcd和context使用
我这里使用的是Go1.14, 安装
github.com/coreos/etcd/clientv3时报错etcd undefined: resolver.BuildOption
原因: grpc版本过高, 将grpc版本替换成v1.26.0版本
详细参考这篇博客: 解决Golang1.14 etcd/clientv3报错:etcd undefined: resolver.BuildOption
连接etcd
连接前要先启动etcd
1 | package main |
通过连接etcd,存值并取值1
2
3
4
5
6
7
8
9
10
11
12
13
14
15
16
17
18
19
20
21
22
23
24
25
26
27
28
29
30
31
32
33
34
35
36
37
38
39
40
41
42
43
44
45
46
47package main
import (
"context"
"fmt"
"time"
"github.com/coreos/etcd/clientv3"
)
func main() {
EtcdExmaple()
}
func EtcdExmaple() {
cli, err := clientv3.New(clientv3.Config{
Endpoints: []string{"localhost:2379", "localhost:22379", "localhost:32379"},
DialTimeout: 5 * time.Second,
})
if err != nil {
fmt.Println("connect failed, err:", err)
return
}
fmt.Println("connect succ")
defer cli.Close()
// put操作
ctx, cancel := context.WithTimeout(context.Background(), time.Second)
_, err = cli.Put(ctx, "/logagent/conf/", "sample_value")
cancel()
if err != nil {
fmt.Println("put failed, err:", err)
return
}
// get操作
ctx, cancel = context.WithTimeout(context.Background(), time.Second)
resp, err := cli.Get(ctx, "/logagent/conf/")
cancel()
if err != nil {
fmt.Println("get failed, err:", err)
return
}
for _, ev := range resp.Kvs {
fmt.Printf("%s : %s\n", ev.Key, ev.Value)
}
}
Watch操作
通过watch监控配置更改1
2
3
4
5
6
7
8
9
10
11
12
13
14
15
16
17
18
19
20
21
22
23
24
25
26
27
28
29
30package main
import (
"context"
"fmt"
"github.com/coreos/etcd/clientv3"
"time"
)
func main() {
cli, err := clientv3.New(clientv3.Config{
Endpoints: []string{"localhost:2379"},
DialTimeout: time.Second,
})
if err != nil {
fmt.Printf("connect to etcd failed, err: %v\n", err)
return
}
fmt.Println("connect etcd success.")
defer cli.Close()
// Watch操作
wch := cli.Watch(context.Background(), "/logagent/conf/")
for resp := range wch {
for _, ev := range resp.Events {
fmt.Printf("Type: %v, Key:%v, Value:%v\n", ev.Type, string(ev.Kv.Key), string(ev.Kv.Value))
}
}
}
构建运行,然后尝试通过etcdctl向etcd指定的key /logagent/conf/发送数据测试1
2
3
4
5PS E:\Study\etcd-v3.4.5-windows-amd64> .\etcdctl.exe put /logagent/conf/ 1
OK
PS E:\Study\etcd-v3.4.5-windows-amd64> .\etcdctl.exe put /logagent/conf/ 2
OK
PS E:\Study\etcd-v3.4.5-windows-amd64>
终端查看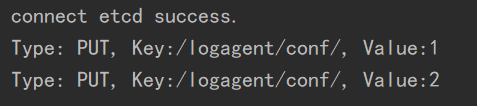
实现一个kafka的消费者代码的简单例子:1
2
3
4
5
6
7
8
9
10
11
12
13
14
15
16
17
18
19
20
21
22
23
24
25
26
27
28
29
30
31
32
33
34
35
36
37
38
39
40
41
42package main
import (
"fmt"
"strings"
"sync"
"time"
"github.com/Shopify/sarama"
)
func main() {
consumer, err := sarama.NewConsumer(strings.Split("localhost:9092",","), nil)
if err != nil {
fmt.Println("Failed to start consumer: %s", err)
return
}
partitionList, err := consumer.Partitions("nginx_log")
if err != nil {
fmt.Println("Failed to get the list of partitions: ", err)
return
}
fmt.Println(partitionList)
// 按照分区来消费
for partition := range partitionList {
pc, err := consumer.ConsumePartition("nginx_log", int32(partition), sarama.OffsetNewest)
if err != nil {
fmt.Printf("Failed to start consumer for partition %d: %s\n", partition, err)
return
}
defer pc.AsyncClose()
go func(pc sarama.PartitionConsumer) {
for msg := range pc.Messages() {
fmt.Printf("Partition:%d, Offset:%d, Key:%s, Value:%s", msg.Partition, msg.Offset, string(msg.Key), string(msg.Value))
fmt.Println()
}
}(pc)
}
time.Sleep(time.Hour)
consumer.Close()
}
但是上面的代码并不是最佳代码,因为这是通过time.sleep等待goroutine的执行,我们可以更改为通过sync.WaitGroup方式实现
使用sync.WaitGroup优化
等待一组goroutine结束
使用Add方法设置等待的数量加1
使用Done方法设置等待的数量减1
当等待的数量等于0时,Wait函数返回
1 | package main |
从etcd中获取配置信息
根据key从etcd中获取配置项1
2
3
4
5
6
7
8
9
10
11
12
13
14
15
16
17
18
19
20
21
22
23
24
25
26
27
28
29
30
31
32
33
34
35
36
37
38
39
40
41
42
43
44
45
46
47
48
49
50
51
52
53
54
55
56
57
58
59
60
61
62
63
64
65
66
67
68
69
70
71
72
73
74
75
76
77
78
79
80
81
82package main
import (
"context"
"encoding/json"
"fmt"
"time"
"github.com/coreos/etcd/clientv3"
)
// 定义etcd的前缀key
const (
EtcdKey = "/backend/logagent/config/192.168.0.11"
)
// 需要收集的日志的配置信息
type LogConf struct {
Path string `json:"path"` // 日志存放的路径
Topic string `json:"topic"` // 日志要发往Kafka中的哪个Topic
}
func SetLogConfToEtcd() {
cli, err := clientv3.New(clientv3.Config{
Endpoints: []string{"localhost:2379", "localhost:22379", "localhost:32379"},
DialTimeout: 5 * time.Second,
})
if err != nil {
fmt.Println("connect failed, err:", err)
return
}
fmt.Println("connect succ")
defer cli.Close()
// 日志配置
var logConfArr []LogConf
logConfArr = append(
logConfArr,
LogConf{
Path: "E:/nginx/logs/access.log",
Topic: "nginx_log",
},
)
logConfArr = append(
logConfArr,
LogConf{
Path: "E:/nginx/logs/error.log",
Topic: "nginx_log_err",
},
)
// Json打包
data, err := json.Marshal(logConfArr)
if err != nil {
fmt.Println("json failed, ", err)
return
}
ctx, cancel := context.WithTimeout(context.Background(), time.Second)
_, err = cli.Put(ctx, EtcdKey, string(data))
cancel()
if err != nil {
fmt.Println("put failed, err:", err)
return
}
ctx, cancel = context.WithTimeout(context.Background(), time.Second)
resp, err := cli.Get(ctx, EtcdKey)
cancel()
if err != nil {
fmt.Println("get failed, err:", err)
return
}
for _, ev := range resp.Kvs {
fmt.Printf("%s : %s\n", ev.Key, ev.Value)
}
}
func main() {
SetLogConfToEtcd()
}
测试能否正常拿到值1
2connect succ
/backend/logagent/config/192.168.0.11 : [{"path":"E:/nginx/logs/access.log","topic":"nginx_log"},{"path":"E:/nginx/logs/error.log","topic":"nginx_log_err"}]
现在我们可以通过操作etcd拿到配置信息,下一步就是拿着这些配置项进行日志收集